Monday, November 26, 2012

Clean, Simple, Merry, and Bright Stripes!

Pin It Now! Hi crafty friends!  Did you do any Black Friday shopping?  I swore I wouldn't, but I did a bit.  Just for fun stuff.  It's a family tradition :)

Today I'm sharing a brainstorm of a combination of cards I love on Pinterest with this week's challenge at Hand Stamped Sentiments.  The challenge is an inspiration photo of colorful, glittered ornaments.  I love the bright colors, and decided to highlight just one pretty ornament on each of two cards...
 I was inspired by the glitter, the bright colors, and particularly the stripes on the two largest ornaments.  I also loved this card I pinned to my Card Love board on Pinterest.
My first card was done with the round ornaments Framelit.  I wanted to duplicate the glittery look and keep it neat, so I headed down to the basement for a little happy messmaking!  I applied spray adhesive to one side of Window Sheet, sprinkled Dazzling Diamonds over it, and flicked off the excess.  While that dried, I cut several 3/4" strips of DSP from Festival of Prints, and one strip of So Saffron from the Subtles paper pack.  I lined them up and adhered them across a piece of paper.  Cut a scrap of red Glimmer paper.  I taped the glittered Window Sheet (glitter side down!) behind the ornament die cut, then lined up the strips of DSP and taped them as well.  Tied the ribbon around the popped up card front.  The letters are cut from my dusty Cricut Expression...it still comes in handy sometimes!  I used Shimmery White CS, and it adds a beautiful sheen to this simple card.
 Here's a close up of the glittered window sheet ornament.  The letters are cut twice, once as a shadow.
The Joy card was done much the same, but no glitter window. I wasn't sure I liked the shiny, so I left the strips alone, but added Crystal Effects and Dazzling Diamonds just around the edge of the ornament once the card was assembled.
 Super simple, and flat enough to mail!
Inside, from More Merry Messages...

So are you inspired to make a project featuring beautiful, colorful ornaments?  Head over to Hand Stamped Sentiments and show what you got!  

Monday, November 19, 2012

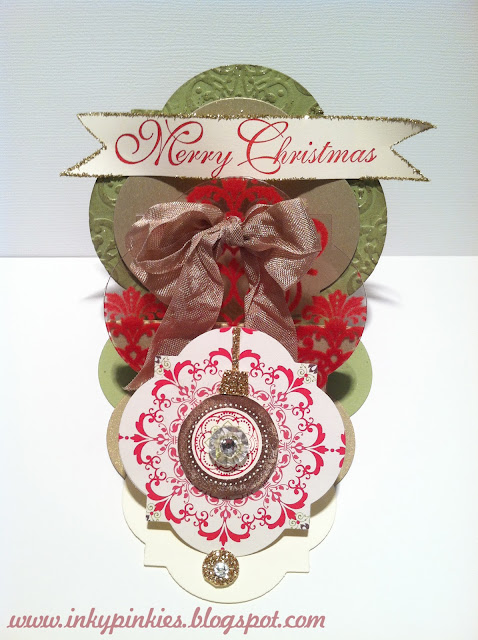
Candlelight Christmas Triple Easel Card HSS145

Pin It Now!
Soooo, who's ready for Christmas?  Nobody?  Okay, who's ready to start getting ready for Christmas?  Me!  I have started making Christmas cookies, made a dozen gift card holders, and I'm neck deep in decorations.  It put me in the mood for an all-out fancy shmancy card.   This one has all I could throw at it...embossing, German glass glitter, Shimmer Paint, flocked acetate sheet, glimmer paper, a double bow, brushed gold paper, and Vintage Faceted buttons!  I love the good stuff.  As Dolly Parton once said, "More is more"!
Fancy folds, cool move cards, whatever you call it, this is the theme at Hand Stamped Sentiments this week!  I decided not just an easel card - but a triple easel card.  (This reminds me of the Triple Dog Dare in the movie A Christmas Story!)
This is basically three sizes of Window Frames Framelits, made into easel cards, and nestled together.  You can get really fancy with the embellishment on this style of card, because you have all these little platforms to work with, and as long as you work with a coordinating group of patterns, i.e. one pack of DSP, it will all come together nicely!

You can get a full tutorial on this style of card from Kim Score at her site.
Here's the rear view. As you can see, each easel card is attached at the halfway point on the next card's base.  It does fold down and fits in a regular card envelope.  Amazing but true!

You should really check out all of the fabulous design team samples, and all of the challenge entries.  There are so many great ideas!
SUPPLY LIST:
STAMPS:  Ornament keepsakes, Greetings of the Season
INK:  Real Red, Lucky Limeade, Early Espresso, Champagne Shimmer Paint
PAPER:  Candlelight Christmas DSP, Lucky Limeade, Very Vanilla, Brushed Gold, Champagne Glimmer paper
EMBELLISHMENTS:Crumb Cake seam binding ribbon, Vintage Faceted button, Basic Rhinestones, German glass glitter (not SU)

Monday, November 12, 2012

Snowflakes! Wonderful Winterland {Salt Brayering}

Pin It Now!
Oh, so cute!  I love these little kids :) Wonderful Winterland is full of playful scenes.  The theme at Hand Stamped Sentiments this week is SNOWFLAKES!

 For this card, I used the "rock salt brayering" technique.  It's easy and turns out pretty neat.  Basically, you sprinkle rock salt onto your cardstock where you want "snowflakes" to appear, sandwich it between your Big Shot plates and run thru. It makes an awful crunching noise, but it's harmless. Brush all the salt into the trash. Then you sponge or brayer over the pits that the salt makes on the CS.  I sponged with Baja Breeze, but brayering would have left the snowflakes whiter.  So I added Crystal Effects and Dazzling Diamonds to enhance the look - added it to the kiddo's outfit, too!

The layout from this card, by the way, is a CASE of a card in the November/December Stampin' Success magazine, available to SU demonstrators.  It's page 14 "Step It Up".  Great design very versatile!  Thanks for the tip, SU ;)  Not a demonstrator, but want to check it out?   Here's a little peek at the latest Stampin' Success Magazine!  http://bit.ly/StampinSuccess_NovDec2012

So is the weather outside frightful where you are?! It has snowed here twice already.

Head on over to Hand Stamped Sentiments and whip up a little something snowy!

Have a blessed and creative day!

SUPPLIES:
STAMPS:  Wonderful Winterland, Greetings of the Season
PAPER:  Certainly Celery, Whisper White, Red Glimmer paper, Snow Festival DSP
INK: Real Red, Staz On Black, Baja Breeze
ACCESSORIES: Crystal Effects, Dazzling Diamonds, Real Red 1/4" Stitched ribbon, Scallop Border punch, Chevron embossing folder, corner rounder punch, sponges.


Monday, November 5, 2012

No-Sew Ruffled Fabric Ensemble - Ustamp With Dawn & Friends!

Pin It Now! If you haven’t tried using Stampin’ Up’s beautiful designer fabrics yet, then here’s a set to try - ruffles and frills, with the warmth of fabric, and not a single stitch is required! A tote for your Stampin’ Up! catalogs, magazines, or gifts, and an embroidery hoop card holder to display your prettiest cards. 

I have created a tutorial for Ustamp With Dawn & Friends! Technique Boutique.  My "technique" is "No Sew Ruffles".  I love fabric, especially Stampin' Up!'s luscious patterned fabric. But I'm not a seamstress, as much as I'd love to claim to be!  So each of the projects in this suite - a tote bag, embroidery hoop card holder, and matching card - feature loads of fancy ruffles that anyone can do!

Here's a closer look!
 A card with nice, neat fabric pleats.
An embroidery hoop completely decked out in fabric, ruffles, and a fabric flower.
And the headliner, this pretty tote.  I use mine to carry my Bible and Sunday school book to church, and am getting lots of requests from my church friends. I'm making them for my downline to hold SU catalogs and Stampin' Success magazines.  It's sturdy and pretty, and you can stash so much inside!

So are you ready to learn this and 40 other technique-y projects?  It's the best deal in crafting, only $24.99 for all the projects, and all the full color step-by-step tutorials.  Click the blinkie below to join today!
Thanks for visiting!  Have a blessed and creative day!  Erika

Peaceful First Christmas

Pin It Now!
...Or, how to turn any color combo into a Christmas card!

Today I'm sharing a card with you that is an example of a bad card gone right.  This week, the challenge at Hand Stamped Sentiments is a color combo - More Mustard, Early Espresso, Old Olive, and Elegant Eggplant.  Nice autumny combo, but I'm so over fall already!  All I want to do is Christmas, Christmas, and Christmas!  But with these colors, I thought I'd have to do something autumn or floral, so I started building a card with Papaya Collage.  Epic fail!  I won't even show you, as most of the focal point went in the trash.  It was a modge podge of layered roses, leaves, a watercolored mess.  So I went with my true desire, and hoped for the best.  What do you think?
The base is layered with Elegant Eggplant, Early Espresso, and Very Vanilla.  The Vanilla base is stamped with En Francais and sponged with Early Espresso.   Tuck a strip of Early Espresso ribbon centered over the Vanilla.

Next, the frame from Papaya Collage is stamped with Early Espresso, fussy cut, and sponged on the outside edges with Elegant Eggplant, and from the center to halfway across the frame with Old Olive.  Then comes the fun part!

The focal image is as follows:
Early Espresso 2-1/8" x 2-7/8"
Very Vanilla 2-3/4" x 2"
Stamp "Peace on Earth" on Vanilla Base.  The bottom edge of this image should be at the halfway point, to leave room for Baby Jesus.
Emboss the Very Vanilla with (super yummy) Sugar & Spice Heat Embossing Powder, using the star from First Christmas and clear VersaMark ink.
Sponge from the outside in with More Mustard, concentrating on the star image and leaving the bottom half lighter, but sponge all the edges. Sponge edges only with Early Espresso.
Your sky will look lit up now!
Finally, stamp Baby Jesus onto a Very Vanilla scrap with Elegant Eggplant, and fussy cut.  Sponge the edges with Elegant Eggplant.  Adhere as shown with Tombo Multi glue.

The frame and the focal image are adhered to the card with Dimensionals.
I think this color combo makes this Christmas card look perfectly regal, as it should <3 !

So what ideas do you have for this earthy combo this week at HSS?  Come on over and play along!